

[Alternate title for this protip: Goodbye, toString()]
Let’s look at a common scenario. Your project doesn’t use AutoValue nor Kotlin, so if you want a decent object representation for debugging, you have to write a lot toString() methods manually. Now, you should be auto-generating that sort of stuff, but that is still tedious and risks getting out of sync with your code.

Let’s take a step back.
Why do we usually have toString()s?
Let’s get one thing out of the way right now: if you’re using toString()s for anything else than providing a human-readable debug representation of an object, you’re doing it wrong. I won’t even begin to explain why in this post, as it’s out of scope.
Now, we only have a few legitimate reasons to have toString()s in our codebase, and of those, the one most people will care about is to have something vaguely useful show up in the debugger when you look for the value of an object.
The default representation is, in fact, quite bad:
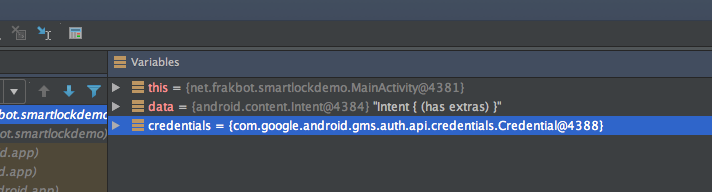
You might notice that Intent is providing its own String representation, which is slightly more useful than none at all. Still, it’s not perfect.
We can do better than that!
Custom data views
IntelliJ IDEA, and thus Android Studio, has a really handy feature: Custom Data Views.
Sometimes, you need a specific type to be shown in the debugger in a certain way instead of the default one. The default representation for an object that has no toString() is the class name and the instance hashcode. That’s usually not helpful at all.
Even if you do have a toString() for your class, though, you’ll find it’s usually cluttered with fields you don’t need, and possibly the ones you need are buried outside of the visible area. In this case, you don’t want to write a custom toString() every time. That, and the risk of committing a hacky toString() to version control, should tell you it’s not a good idea.
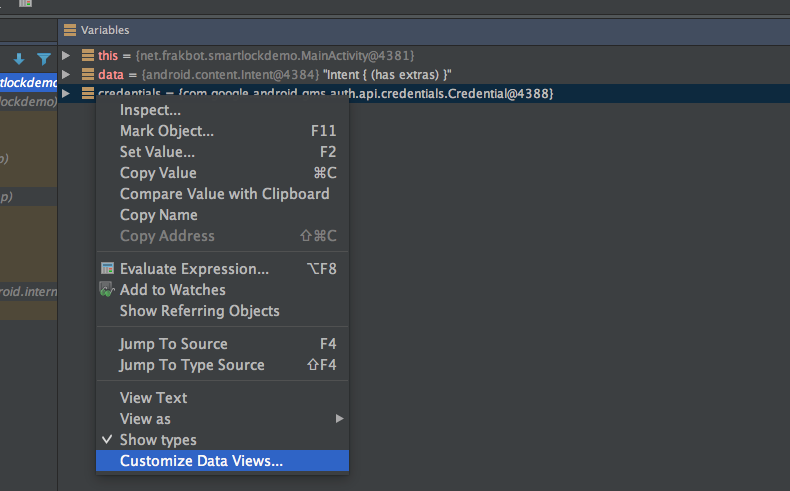
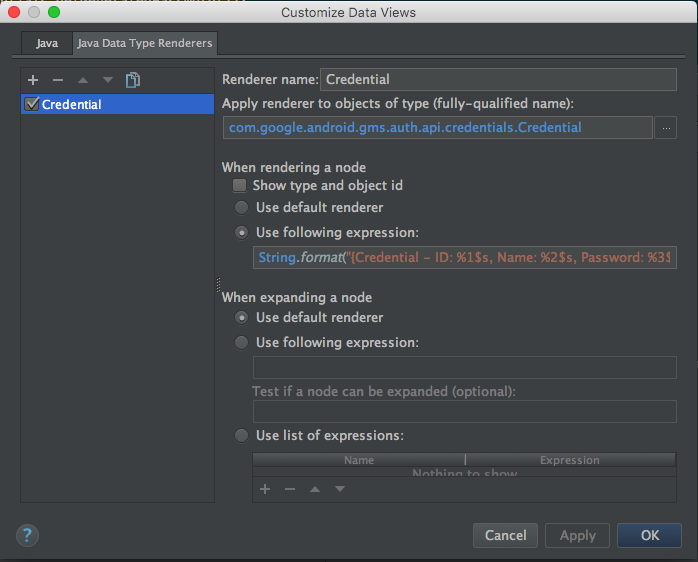
In this case, you can create a custom Java Data Type Renderer for your class, that better suits your current needs, being confident you’re not altering the observed classes while still getting the information you want (hey, uncertainty principle).
For example, while working on the Smart Lock for Passwords demo app, I wanted to keep an eye on the Credentials I was getting back from Play Services when debugging. That class has no toString() implementation, and wasn’t under my control (nor I had the sources). I created a simple data renderer:
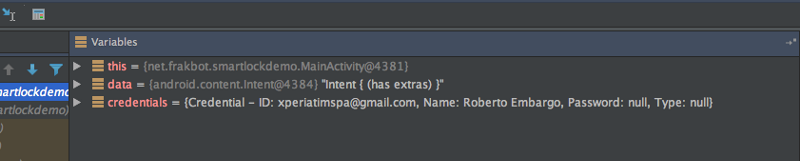
From that moment onwards, my IDE started showing me this information whenever I had a Credential instance in the scope:
You can also define a list of expressions to use when expanding the node, like this:

Did you know?
Even without creating custom data type renderers, you can change the way data appears in the debugger. For example, you can pick whether an int should be shown as a decimal or hexadecimal value — or maybe as a resource ID.
That’s actually how some values are rendered into their Android-specific meaning in the debugger!
The only thing you need to do is to right click a variable in the debugger, and pick the kind of representation you need in the View as menu.
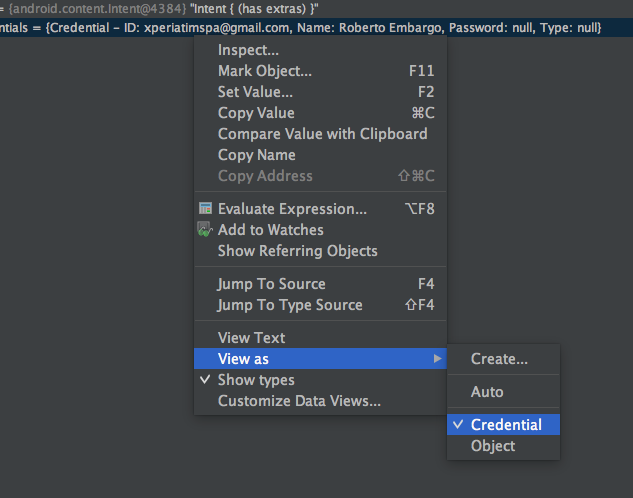
The nice thing about data renderers is that, as we have seen for Credential, you can use them for classes you don’t own and you don’t have the sources for. You couldn’t do this with AutoValue or Kotlin. Plus, you don’t need to rebuild/redeploy the changes for it to work.
On the other hand, this won’t help with logging object values, or with unit tests. But you can use both a custom viewer and AutoValue (or Kotlin’s data classes) to get the best of both worlds!
Want to read more?
You can take a look at the other posts in this series.