


[Alternate title: YOU get a cursor, and YOU get a cursor!]
Changing casing to some token is one of those things that, taken in small doses, we all endure daily without breaking much of a sweat. Most of the time, it’s about simply renaming a single variable or method. In that case, the refactoring tools that the IDE puts at our disposals are more than enough for quickly getting it done: Rename refactorings, CamelHumps, and such are a godsend.
But what happens when we’re doing a mass refactoring, and we want to change a lot of identifiers at the same time? What if what we want to do is a text-based case change rather than a refactor-based one? Or maybe you’re editing a JSON or some other file type for which no refactoring is available.
Android Studio to the rescue!
A Case of multiple selections
Since IntelliJ IDEA 13.1 (and Android Studio versions based upon that), you can have multiple cursors in your IDE, similarly to what you can do in Sublime Text. To get multiple cursors, the easiest but least convenient way is to hold Alt-Shift and click where you want a new cursor.
But in here we’re all about the keyboard shortcuts, and so I’m happy to say, the IDE has got you covered there as well. A simple Ctrl-G (Alt-J on Win/Linux) will select the next occurrence of the token your cursor is on (or of the current selection). You can also do Ctrl-Shift-G (or Alt-Shift-J) to undo the last selection if you notice you’ve gotten too far. Lastly, Ctrl-Cmd-G (Ctrl-Shift-Alt-J for non-Mac users) will select all occurrences.
Once you have multiple cursors, you can simply start typing normally, and it’ll affect all the cursors. For example, you can move the cursors around, type new stuff, and so on:
But what has this to do with changing case?
Toggle that case
Turns out, IntelliJ allows you to change the case of any selected text by using the Toggle case action, or simply Cmd-Shift-U (Ctrl-Shift-U for non-Mac users).
- Lowercase text will become uppercase, and vice versa.
- CamelCase text will turn into lowercase. If you invoke the Toggle Case action again after that, it’ll be toggling between upper and lower case.
Now, you’ll certainly be making one plus one of where this is going. We talked earlier about having more carets and selections, and now about toggling the case of the current selection. So you’ll certainly be wondering, is it going to be possible to make the two work together?
Well of course!
As a result, we have an easy way to change the case of one or more occurrences of some text quickly. Or even, change it of any arbitrary body of text — just create as many cursors as you need and select what you want, then toggle its case!
Unfortunately, this has a couple of shortcomings. In the first place, this can only be done on a single file; there’s no Select next occurrence that works across files. Nor one that’s limited to a certain selection, or number of selections, to find into. And besides, what if we need more complex manipulation?
Say hi to our old friends, regular expressions
Expressions of case
You surely already know you can search and replace inside of a given file. You hopefully also know you can search and replace in any folder of the project, invoking the Find in Path or Replace in path dialogs. That’s Cmd-Shift-F and Cmd-Shift-R for you (or, with Ctrl instead of Cmd if you don’t use a Mac, or use the old school Mac OS keymap like yours truly).
Now, you have a bunch of options for searching, like matching the case, using regular expressions, and so on. You can’t really change the capture groups for the replace part though, can you?
You would normally have something like this:
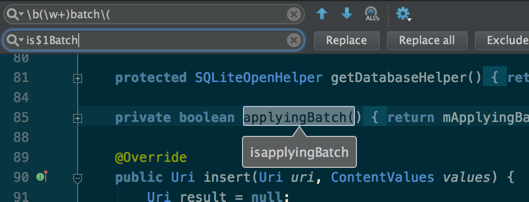
As you can see in this very much contrived example, simply using this search and replace setup would not work as it would break camel casing.
To help us get what we really want, we have some very little known allies, in the form of some case modifiers to use for the replace clause:
\lmakes the next character lowercase\umakes the next character uppercase\Lmakes the next characters lowercase, until the matching/E\Umakes the next characters uppercase, until the matching/E
This is enough to cover most situations, such as our example:

Remember, if you have a refactoring available to rename a symbol, that’s usually the wise way to go — unless you’re trying to rename a bunch of internal symbols that all look kinda the same and you’re super sure won’t break other stuff. Or if you can’t use refactorings. In those cases, this is going to save you a lot of time!
Now, this is the last of the planned Android Studio protips. As the wise man says, seven is the biggest number of anything, so this is a wrap. Thanks everyone for your great feedback, stay tuned for more posts. I have a bunch already lined up that I think you’ll like.

Want to read more?
You can take a look at the other posts in this series.