


This is the second part of a two-parts series. In the first part we saw how we can use a set of free tools to set up a CI for your projects. Here we’ll get in the nitty-gritty of how to configure CircleCI to get the most out of it.

Create the CircleCI project
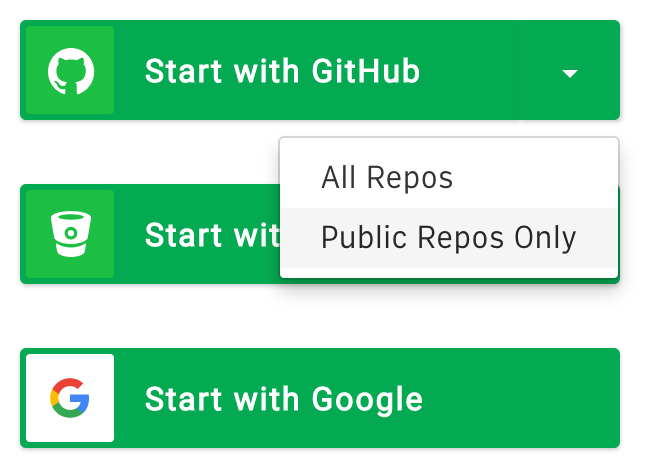
In the first part of the series we went through the whys and whats of getting your projects to get Continuous Integration. Now it’s time to get our ducks in a row, and proceed with the actual CI configuration. Since we decided that CircleCI would be our CI provider, we’ll first need to sign up for it. I’d recommend to sign up using GitHub as identity provider if your code is hosted there. There is an easy way to give access only to your public repositories:
You may of course use any of the identity providers. If your code lives on BitBucket it makes perfect sense to use that instead, to avoid having to set it up later.
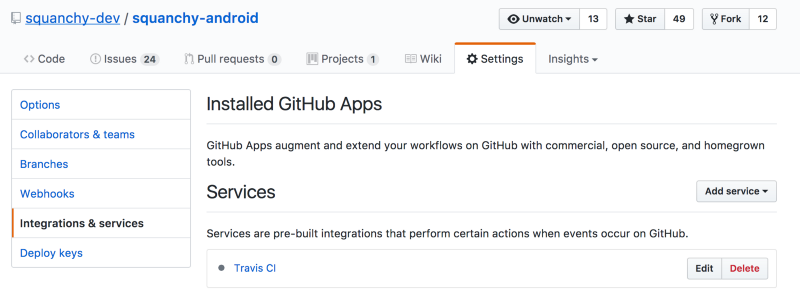
Once you’re signed up, head to the Add Project page and select the organisation and repo you want to add CircleCI to. Doing this will automatically configure the CircleCI service in the GitHub repo:
When you add a project, CircleCI will immediately trigger a build for the latest commit on the main branch, trying to infer the configuration. It’ll likely pick up it’s a Gradle project, but might not be able to pick up everything it needs. In my case, the first build failed because the build configuration was not set up in the CI environment.

To make it work for us we’ll need to configure the CI builds. Most of the work is done in the repo itself via a circle.yml file that CircleCI reads and uses to configure the virtual machines that run the build.
It has taken me a significant amount of time and research to come up with a satisfactory circle.yml file; the documentation for CircleCI is somewhat useful but some parts of it are really vague and won’t really point you directly to a solution. Rather, you have to interpolate and read between the lines to understand how to get what you want. It doesn’t help either that most of the examples for CircleCI with Android projects are either very old, based on trivial examples with none of the advanced behaviour I want, or both. I hope then that this guide will be helpful to the Android Dev community as at least a baseline of information on how we can use these great tools to our advantage.
Note: as I write, I am using CircleCI 1.0. They have a version 2.0 in beta, that uses Docker and it is supposedly rather different from the current iteration. They don’t explicitly support Android, and there’s very little documentation and information about it, so for now I decided to give it a pass.
The circle.yml file
This is the whole circle.yml contents for Squanchy at the time of writing. We’ll examine the whole file section by section next. For now, take a quick look at it and see if you can figure out what each thing does.
machine:
    java:
        version: oraclejdk8
    environment:
        ANDROID_HOME: /usr/local/android-sdk-linux
        ANDROID_BUILD_TOOLS: 25.0.2
        APPLICATION_ID: net.squanchy.example
        FABRIC_API_KEY: 0000000000000000000000000000000000000000
        GOOGLE_MAPS_API_KEY: DUMMY_GOOGLE_MAPS_API_KEY
        NEARIT_API_KEY: DUMMY_NEARIT_API_KEY
        TWITTER_API_KEY: DUMMY_TWITTER_API_KEY
        TWITTER_SECRET: DUMMY_TWITTER_SECRET

dependencies:
    pre:
        # Remove any leftover lock from previous builds
        - rm -f $HOME/.gradle/caches/modules-2/modules-2.lock

        # Make sure we have the sdkmanager available, and update the Android SDK tools if not
        - if [ ! -e $ANDROID_HOME/tools/bin/sdkmanager ]; then echo y | android update sdk --no-ui --all --filter tools; fi

        # Pre-accept Android SDK components licenses
        - mkdir "$ANDROID_HOME/licenses" || true
        - echo -e "\n8933bad161af4178b1185d1a37fbf41ea5269c55" > "$ANDROID_HOME/licenses/android-sdk-license"

        # Install all the required SDK components
        - $ANDROID_HOME/tools/bin/sdkmanager --verbose "platform-tools" "build-tools;"$ANDROID_BUILD_TOOLS "extras;google;m2repository"

    override:
        # Force Gradle to pre-download dependencies for the app module (the default would only be for the root, which is useless)
        - if [ -f ./gradlew ]; then ./gradlew app:dependencies --console=plain --no-daemon;else gradle app:dependencies --console=plain --no-daemon;fi

    cache_directories:
        # Android SDK
        - /usr/local/android-sdk-linux/tools
        - /usr/local/android-sdk-linux/platform-tools
        - /usr/local/android-sdk-linux/build-tools
        - /usr/local/android-sdk-linux/licenses
        - /usr/local/android-sdk-linux/extras/google/m2repository

        # Gradle caches
        - /home/ubuntu/.gradle/caches/
        - /home/ubuntu/.gradle/wrapper/

test:
    pre:
        # Create mock Play Services JSON
        - ./team-props/scripts/ci-mock-google-services-setup.sh

    override:
        - ./gradlew check --no-daemon --console=plain --continue

    post:
        # Collect the JUnit reports
        - mkdir -p $CIRCLE_TEST_REPORTS/reports/junit
        - find app/build/test-results/ -name "*.xml" -exec cp {} $CIRCLE_TEST_REPORTS/reports/junit/ \;

        # Collect the Android Lint reports
        - mkdir -p $CIRCLE_TEST_REPORTS/reports/lint
        - find app/build/reports -name "lint*.html" -exec cp {} $CIRCLE_TEST_REPORTS/reports/lint/ \;
        - find app/build/reports -name "lint*.xml" -exec cp {} $CIRCLE_TEST_REPORTS/reports/lint/ \;

        # Collect the Checkstyle reports
        - mkdir -p $CIRCLE_TEST_REPORTS/reports/checkstyle
        - find app/build/reports/checkstyle -name "*.html" -exec cp {} $CIRCLE_TEST_REPORTS/reports/checkstyle/ \;
        - find app/build/reports/checkstyle -name "*.xml" -exec cp {} $CIRCLE_TEST_REPORTS/reports/checkstyle/ \;

        # Collect the Findbugs reports
        - mkdir -p $CIRCLE_TEST_REPORTS/reports/findbugs
        - find app/build/reports/findbugs -name "*.html" -exec cp {} $CIRCLE_TEST_REPORTS/reports/findbugs/ \;
        - find app/build/reports/findbugs -name "*.xml" -exec cp {} $CIRCLE_TEST_REPORTS/reports/findbugs/ \;

        # Collect the PMD reports
        - mkdir -p $CIRCLE_TEST_REPORTS/reports/pmd
        - find app/build/reports/pmd -name "*.html" -exec cp {} $CIRCLE_TEST_REPORTS/reports/pmd/ \;
        - find app/build/reports/pmd -name "*.xml" -exec cp {} $CIRCLE_TEST_REPORTS/reports/pmd/ \;

        # Collect the Detekt reports
        - mkdir -p $CIRCLE_TEST_REPORTS/reports/detekt
        - find app/build/reports/ -name "report.detekt" -exec cp {} $CIRCLE_TEST_REPORTS/reports/detekt/ \;
Configure the VM
The first section of the configuration file is all about setting up the virtual machine that will run the build:
machine:
    java:
        version: oraclejdk8
    environment:
        ANDROID_HOME: /usr/local/android-sdk-linux
        ANDROID_BUILD_TOOLS: 25.0.2
        APPLICATION_ID: net.squanchy.example
        FABRIC_API_KEY: 0000000000000000000000000000000000000000
        GOOGLE_MAPS_API_KEY: DUMMY_GOOGLE_MAPS_API_KEY
        NEARIT_API_KEY: DUMMY_NEARIT_API_KEY
        TWITTER_API_KEY: DUMMY_TWITTER_API_KEY
        TWITTER_SECRET: DUMMY_TWITTER_SECRET
The java section tells CircleCI that we need a JDK on our machine; in particular, that we need the oraclejdk8 — you could also use the OpenJDK 8, but this is replicating the same setup most devs use on their machine.
Next, comes the environment section, that tells the CI what environment variables to set up for the build. ANDROID_HOME is a convenience variable which points to the fixed location of the Android SDK in the CI images, and ANDROID_BUILD_TOOLS will be used later on to determine which version of the build tools we need to have installed to be able to build the project.
All the following values are dummy values that the Gradle Build Properties plugin will pick up and use during the build; they would normally be picked up from a non-versioned file on the developer’s machine, but can also be read from the environment if the former is missing (like it’s the case on the CI). This way we don’t have to hack around to have a “default” file in VCS to provide those values, which are required for the build.
Dependencies
Next up in circle.yml is the dependencies section, which is composed of three main sections. Before diving into the dependencies section, you should know that most sections in circle.yml can contain pre, override, and post sections. The pre and post sections are, quite obviously, containing commands to execute respectively before and after the main block, which is confusingly named override (I assume because it’s overriding the default inferred behaviour).
Each top-level section then can have their own special blocks, such as cache-directories for dependencies. We’ll look into those as we stumble into them.
Preparing the environment
dependencies:
    pre:
        # Remove any leftover lock from previous builds
        - rm -f $HOME/.gradle/caches/modules-2/modules-2.lock

        # Make sure we have the sdkmanager available, and update the Android SDK tools if not
        - if [ ! -e $ANDROID_HOME/tools/bin/sdkmanager ]; then echo y | android update sdk --no-ui --all --filter tools; fi

        # Pre-accept Android SDK components licenses
        - mkdir "$ANDROID_HOME/licenses" || true
        - echo -e "\n8933bad161af4178b1185d1a37fbf41ea5269c55" > "$ANDROID_HOME/licenses/android-sdk-license"

        # Install all the required SDK components
        - $ANDROID_HOME/tools/bin/sdkmanager --verbose "platform-tools" "build-tools;"$ANDROID_BUILD_TOOLS "extras;google;m2repository"
The pre section here is in charge of doing some preliminary cleanup of leftover .lock files that may have been left around in previous builds (if the VM is shared). I am not sure if this is really needed but it seems quite a few of the references I used for building this up did have it. Better safe than sorry, I suppose.
Next, we take care of making sure the Android SDK is up-to-date and contains all the dependencies that we need. The first line is a workaround I added for the CircleCI having an outdated Android SDK install, which doesn’t contain the sdkmanager command. If the tool is not available, we update the Android SDK tools. We also make sure we pre-accept the Android SDK licence, so the next step will not fail because of the missing licence agreement.
Then, we install the actual dependencies; we need the platform-tools, the build-tools (using the environment variable ANDROID_BUILD_TOOLS to determine the exact version), and the local Google Play Services Maven repository. The Google Maven Repository does not contain the Play Services at the time of writing; every other Android dependency will come from there, but not the Play Services/Firebase libraries.
Obtain all the build dependencies
dependencies:
    # ...
    override:
        # Force Gradle to pre-download dependencies for the app module (the default would only be for the root, which is useless)
        - if [ -f ./gradlew ]; then ./gradlew app:dependencies --console=plain --no-daemon;else gradle app:dependencies --console=plain --no-daemon;fi
In the override section, we hack around to get Gradle to pre-download all needed dependencies. There is no official way to do it, but luckily, the app:dependencies has the side effect of resolving, and thus downloading, all the dependencies for a module.
The default inferred behaviour is to run the dependencies task on the root project (: in Gradle terms); we need to override it because you want to use the leaf module so that it gets all dependencies for all modules you want to build. In our case, like in most cases, the leaf node is the app.
The if/else is mostly a form of caution to account for the Gradle Wrapper to be missing. To be honest, that should never be the case, but I wanted to make the most adaptable example I could. The --console=plain flag tells Gradle to use a plain console output format instead of the fancy one it normally uses, so that CircleCI can actually parse it. --no-daemon indicates not to reuse any pre-existing daemon. Again, there should never be one at this point, but I wanted to make sure all possible scenarios would be taken into consideration.
Cache the dependencies
dependencies:
    # ...
    cache_directories:
        # Android SDK
        - /usr/local/android-sdk-linux/tools
        - /usr/local/android-sdk-linux/platform-tools
        - /usr/local/android-sdk-linux/build-tools
        - /usr/local/android-sdk-linux/licenses
        - /usr/local/android-sdk-linux/extras/google/m2repository

        # Gradle caches
        - /home/ubuntu/.gradle/caches/
        - /home/ubuntu/.gradle/wrapper/
This block is relatively easy to understand. The dependencies section has a cache_directories node that tells the CI what to cache between builds so that it can be reused. The caching and restoring is slightly faster than Travis’, but not incredibly fast, so it may be faster in some cases to not cache and instead re-download things.
In my case, I found it to be slightly faster than re-downloading everything — mostly thanks to the slowness of the Android SDK manager — so I went with it. I am basically caching all the Android SDK components I download in the override block, and the Gradle dependencies and wrapper caches.
The test section
In CircleCI, the test section is the main section of the job. It’s the one that specifies what to do to assert that the codebase is in a good state. It’s usually used to compile, run the tests, and static analysis. In this case the pre and override sections are very simple:
test:
    pre:
        # Create mock Play Services JSON
        - ./team-props/scripts/ci-mock-google-services-setup.sh

    override:
        - ./gradlew check --no-daemon --console=plain --continue
The pre section is invoking a script that creates a mock google-services.json file — used by the Google Services plugin to configure all the Play Services and Firebase API keys for you. This cannot unfortunately be done with environment variables, and you definitely don’t want to put your actual API keys into VCS, so this is the simplest workaround.
The override section is simply invoking the check task on the Gradle build. The task is configured to run all static analysis and tests, and we pass the --continue flag to make sure all checks are run even if some of them fail. This way we can fix all issues in a single run instead of going back and forth for each failing check.
Collecting the results
By default, CircleCI supports interpreting JUnit’s output and can show it in the job page:

To be able to pick it up, though, you need to manually copy the JUnit .xml reports into a subfolder of the special folder $CIRCLE_TEST_REPORTS. It’s very important that it’s in a subfolder, otherwise CircleCI will not pick them up.
While only JUnit test results are displayed directly, anything you put in that folder will be collected as a report artifact and will be accessible from the Artifacts tab:
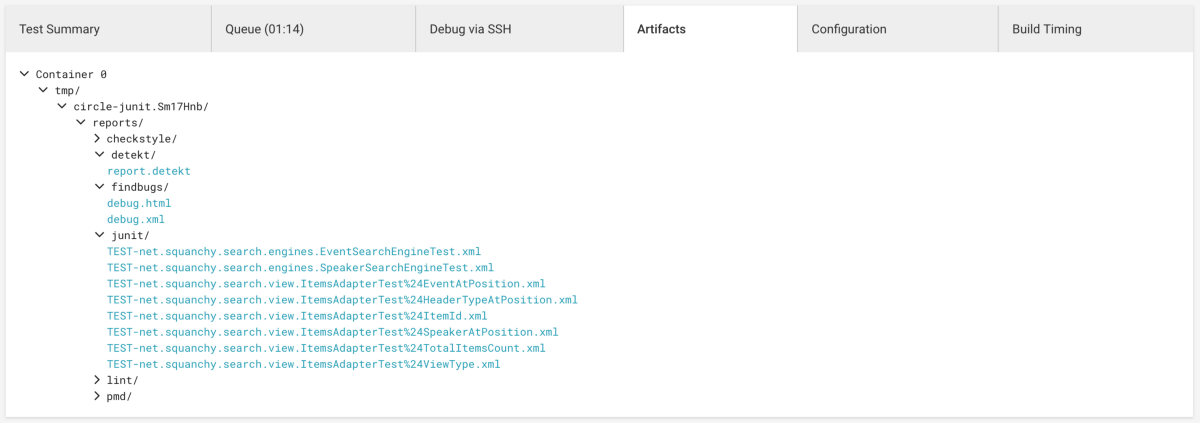
If you store the HTML reports there too, you’ll be able to easily access the tools’ reports by just clicking them. It’s not as convenient as the Jenkins reports that we aim to replicate, but it’s a decent approximation. A Chrome extension could probably present direct links to all those reports in the Test Summary tab too. If somebody were to develop such extension, they’d get all my gratitude 😄
The same mechanism can be used to store build artifacts. Instead of copying them into the test reports folder, you declare them in theartifactsstanza. The CI will copy them into$CIRCLE_ARTIFACTSfolder; everything is then collected together with the test reports and archived on S3 for you.
How do we get all those reports in there?, you might be asking yourselves. As you might have guessed, it’s done the same way as for the JUnit tests reports. We just have to populate a specific subdirectory with each tool’s outputs. In the circle.yml we have:
test:
    # ...
    post:
        # Collect the JUnit reports
        - mkdir -p $CIRCLE_TEST_REPORTS/reports/junit
        - find app/build/test-results/ -name "*.xml" -exec cp {} $CIRCLE_TEST_REPORTS/reports/junit/ \;

        # Collect the Android Lint reports
        - mkdir -p $CIRCLE_TEST_REPORTS/reports/lint
        - find app/build/reports -name "lint*.html" -exec cp {} $CIRCLE_TEST_REPORTS/reports/lint/ \;
        - find app/build/reports -name "lint*.xml" -exec cp {} $CIRCLE_TEST_REPORTS/reports/lint/ \;

        # Collect the Checkstyle reports
        - mkdir -p $CIRCLE_TEST_REPORTS/reports/checkstyle
        - find app/build/reports/checkstyle -name "*.html" -exec cp {} $CIRCLE_TEST_REPORTS/reports/checkstyle/ \;
        - find app/build/reports/checkstyle -name "*.xml" -exec cp {} $CIRCLE_TEST_REPORTS/reports/checkstyle/ \;

        # Collect the Findbugs reports
        - mkdir -p $CIRCLE_TEST_REPORTS/reports/findbugs
        - find app/build/reports/findbugs -name "*.html" -exec cp {} $CIRCLE_TEST_REPORTS/reports/findbugs/ \;
        - find app/build/reports/findbugs -name "*.xml" -exec cp {} $CIRCLE_TEST_REPORTS/reports/findbugs/ \;

        # Collect the PMD reports
        - mkdir -p $CIRCLE_TEST_REPORTS/reports/pmd
        - find app/build/reports/pmd -name "*.html" -exec cp {} $CIRCLE_TEST_REPORTS/reports/pmd/ \;
        - find app/build/reports/pmd -name "*.xml" -exec cp {} $CIRCLE_TEST_REPORTS/reports/pmd/ \;

        # Collect the Detekt reports
        - mkdir -p $CIRCLE_TEST_REPORTS/reports/detekt
        - find app/build/reports/ -name "report.detekt" -exec cp {} $CIRCLE_TEST_REPORTS/reports/detekt/ \;
Each tool gets its destination subfolder created, and then we copy over the reports (both HTML and XML) recursively into those folders, flattening the hierarchy where needed for easier consultation. A further reason to use find versus using cp directly is that, in case some tool were not to emit a report for whatever reason, that would not turn the build red (any task command exiting with a non-zero code will make the build go red). find will simply not execute cp if it doesn’t match anything.
Per aspera ad astra
With this, after all this playing around with the build itself and with the CI configuration, we finally have implemented the job like we wanted to. We got the best approximation possible of the Jenkins dashboard, on CircleCI.
If you have a Jenkins CI that you can use, or some other highly sophisticated CI such as TeamCity, then you probably should stick to that. For example, I am very happy Novoda provides a CI on Jenkins for our open source projects as it’s very powerful and much more flexible than this setup. On the other hand, given I cannot run my personal projects on Novoda’s Jenkins and I don’t want to go through the hassle and expense of hosting my own Jenkins instance somewhere, this is good enough.
What’s next, then? The development of Detekt is the one that will bring the most news in the coming months; as of today it still doesn’t have a proper report format for its issues and it’s still very much a moving target.
Maybe some work could be done on the client side to set up a pre-commit hook on git to ensure all code is formatted with Detekt. That will be even easier if you keep your IDE settings in version control, since Detekt can now use IDEA/Android Studio itself to perform the formatting.
If you have device instrumentation tests, e.g., if you run tests on Firebase Test Cloud, you might want to use multiple VMs for each job and split the responsibilities by taking advantage of the parallelism CircleCI offers you.
If you have any suggestions on what could be the next step, do not hesitate to leave a reply here or to ping me on Twitter.